Category Archives: GPL

Mandriva Linux Spring 2010

Finally, I managed to install Mandriva Linux 2010 Spring. As usual, I installed the One version. Mandriva builds on its excellent tradition by producing yet another great release. Spring 2010 come with KDE 4.4.3 and the usual assortment of applications.

Mandriva Linux Spring 2010

Mandriva Linux Spring 2010

So far it has been a smooth ride except for one annoying problem. I am not able to shut down my laptop. I hear the logout sound being played but nothing happens after that. However, I am able to do so by logging out and then shutting down which is a bit of a pain. While I wait for a fix to this problem, I am going to check out how openSUSE 11.3 fares against Spring 2010

A first look at Ubuntu 8.04 – Hardy Heron

Yesterday evening, I installed the spanking new Hardy Heron on my laptop. This post is not going to be a complete review, but I will just cover the major points. For more information, please refer to my twitter timeline. I just don’t have enough time on my hands for a complete review.

  • No installation problems. Installs under 30 minutes for a clean install.
  • The laptop is more snappy now. I run a Dell Inspiron 6400 with Intel Core 2 Duo at 1.73 MHz and 1 GB RAM with 1 GB swap space. The system boots up faster, responds well and shuts down much faster compared to Gutsy.
  • Firefox 3 Beta is stable, no bugs or crashes until now
  • I installed the server apps today. I run Apache, MySQL and PHP – this took me some time to backup and restore the databases and blogs. Nothing to do with those apps though
  • The repositories seem to be heavily loaded now. So I advice to select the Best Server from the Synaptic package manager.
  • Wireless works. Ethernet works(it should, ain’t it?), Compiz works, OpenOffice.org works, codecs downloaded for the various media types. Pretty much all the standard stuff work.
  • Installing additional applications might take some time. For example, AWN is included in the repo but not many applets are available. So I had to add another source and install from it. I had the latest Flash version downloaded, so that was a snap to install. I prefer Amarok to Rhythmbox, so I installed it.
  • On the bad side, my laptop froze twice in two days. Yes it froze! Just like windows. Mouse did not respond neither did the keyboard. Ctrl+Backspace did not work either. So it was not X problem.
  • Most of the old GNOME GTK Icon themes don’t seem to work. Not sure what the problem is. My favorite Mac OSX Icon theme displays the default GNOME folder icon. This is the case with most other themes too. Has something changed in the way themes have to be created for GNOME 2.22? No idea.
  • Suspend works perfectly. Hibernate works, but considering the time taken to wake up, one can shut down and restart.
  • Brightness management seems to have gone bad. I am able to use the Fn key and get only two levels of brightness which forces me to add the Brightness management applet on the panel. I used to get ten levels in Gutsy.
  • Movie player does not play more than 8 sec of VOB files from DVD. VLC has no issues though. The file is just 1024 MB and had no issues on Gutsy.
  • Bluetooth worked after installing the Bluetooth File Sharing from Add/Remove programs. If this is required, why cant it be installed by default? I was able to send and received files to my Nokia phone but was not able to browse the phone on the computer. I was able to do this on Gutsy after installing gnome-vfs-obexftp but no luck here.
  • Apart from these minor irritations, the release is pretty good. I would not say solid because and OS freezing a computer cannot be called solid.

The real test for this release will be on the coming weekend when I will install it on my 7 year old P III computer running at 1.1 GHz and having 256 MB RAM with no graphics capability whatsoever. Gutsy is running pretty slow. I want to see how the Heron fares. No, dont suggest me to try Xubuntu. We are talking about Ubuntu here 😉

My conclusion is everyone can use this distribution, but some hand holding might be required for newbies. I should say that this is one of the releases that I had to spend more time on setting up the computer. This is also partly due to the fact that I have a lot of stuff to backup and restore.

Mandriva Linux One 2008 Spring – Screen shots

Mandriva Linux Spring 2008 was released a few days back and today I got a chance to have a look at it. The distro can be downloaded at the Mandriva site. If I should say in one word about this release, its gorgeous. The artwork is great and so is the performance.

On my system, running an Intel Core 2 Duo at 1.73 MHz with 1 GB RAM and an Intel 945 GMA, it ran smoothly even from the Live CD. I was able to launch multiple apps and still there was no problem. Mandriva seems keen in reviving its glory and this release is well on target.

The main highlights of this release are Openoffice.org 2.4 and PulseAudio. KDE is version 3.5.9. All the other standard KDE utilities are available and the Mandriva Control Center makes life easy.

This is not a full review, but just a visual tour. Go here and enjoy the screen shots.

First Look at KDE 4

KDE 4 the desktop environment for Linux was released on Jan 11. The release announcement is here. A nice guided tour is also available here. Having looked at KDE 4 Beta 4 and KDE 4 RC 1, I could not wait to get my hands on the final release. I downloaded the SUSE CD image, burnt it and got started.

The test system was custom built. I have given the spec below even though I tested using a Live CD

  • Intel Core 2 Duo E4500 @ 2.2 GHz
  • 2 GB DDR2 RAM
  • Seagate 250 GB HDD
  • nVidia GeForce 8500 GT with 512 MB RAM
  • LG Super Multi DVD Writer
  • Acer 17″ LCD monitor

The Good

1. Stability – The final release is far more stable and usable than the two previous releases I had looked at. This is only to be expected. Congrats to all the developers who had worked on KDE 4

2. Response – The UI was very responsive and I never experienced a lag even while running multiple applications

3. Eye Candy – Plasma has improved greatly. Though the widgets provided don’t do anything great, they dont crash as they did earlier. Even the controls – buttons, scroll bars and the like – have been converted to blue which is more pleasant than the default green of SUSE Linux. The Oxygen icon theme looks beautiful, though I still could find some icons missing under Applications

4. Desktop Effects – Unfortunately, I could not enable the desktop effects while running the Live CD. I don’t have a spare system to install and check it out 😦

5. Configuration – The monitor was recognized and the correct resolution was set. Similarly, the network card, sound and everything else was configured on boot. Once I get my laptop, I should check for Wi-Fi. I know this is more of an OS thing but still I want to mention this here since last time I could not get my Ethernet card detected.

The Bad

1. Kickoff – After looking at Kickoff, I should say, whoever came up with this idea did not have the least idea of what usability is. And what pains me is the decision to use this idea and bring it out in the final product. Why should I click four times to open an application?

2. Konqueror – Again, how come Konqueror can even be imagined as the default web browser. Most sites don’t work on it. It was good to use it as a file manager in previous KDE versions and Konqueror was very good at that. But to use it as a web browser is a little disappointing. Mozilla Firefox should have been there, or if you are against it pitch for Opera.

Conclusion

A great release. Though the Live CD did not have a usable browser or an office suite, I assume it is up to the distros to add their favorite applications on top of the platform.

Screen shots

Ubuntu Gutsy Gibbon Screenshots

As promised, here are a couple of screenshots of Ubuntu Gutsy Gibbon with CompizFusion and Avant Window Navigator

1. Expo Plugin

Expo Plugin

2. Shift Switcher

Shift Switcher

3. Water Effect

Water Effect

4. Avant Window Navigator

Avant Window Navigator

I could not capture the screenshots of the rotating cube. Any ideas how to do it?

Update: Oct 25, 2007: Adding the cube effect screenshot

cube.png 

Evolution on Ubuntu Gutsy Gibbon (7.10)

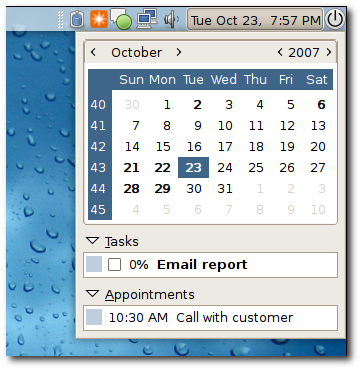
I have been using the Evolution email client on Ubuntu Feisty Fawn (7.04) regularly for email as well as calendaring. I access my Google Calendar from Evolution. Why? The simple reason is at the click of a mouse on the calendar on my panel, I can see the appointments and tasks for the day.

This is when I installed – yes, clean install with the /home partition intact – Ubuntu Gutsy Gibbon (7.10). When all other applications retained their settings, I was bewildered to see that Evolution did not even start. I had about 500 emails and 150 contacts in the address book. The only consolation is I had a backup of the address book.

I removed Evolution completely and reinstalled it. Nothing improved. I tried to remove the .evolution folder from my /home partition. Still nothing happened. I thought of sorely missing my most beloved feature and installed Mozilla Thunderbird and downloaded all the email from my Gmail account. I tried to install the Lightning calendar add on for Thunderbird but that did not look good. It by no way was going to show my tasks in the panel calendar.

Then I read a little and found that the new version of Evolution in Gutsy did not like the older one and spoiled the older versions settings. So I removed the .evolution folder from /home and also the .gconf/apps/evolution folder. I rebooted. I then started Evolution and voila it started up with the wizard to add email accounts. I added my email accounts and then downloaded a few emails.

I was still skeptical. I rebooted and checked if Evolution could come to life. To my relief it came up. I then configured the calendars, imported my address book from the backup and off I went. The upside is that I was again able to use Evolution and the downside is I had to download my POP3 email twice over. That’s almost 800MB a real wastage of bandwidth.

Well, if you were wondering about what I am talking about, here it is. See the convenience, can you?

Calendar

Draw regular shapes using The GIMP

I have been a user of GIMP for a while now. While I was able to do whatever change to existing images, today I was faced with a new challenge. Well, how do I draw a simple non-filled rectangle? I could not find any tool in GIMP which would help me create a simple rectangle. A decent image editor should provide an easy way to draw regular shapes right?

After a bit of searching I found a way to draw a simple rectangle. Here it is for all of you who may need it.

Step 1: Open GIMP

Step 2: Create a new Image by clicking on File > New and selecting the image size from the dialog that pops up

Step 3: Click on the Select Rectangular Regions tool. [Figure 1]

Step 4: Draw a rectangular selection on the image. [Figure 2]

Step 5: From the menu choose Edit > Stroke Selection. [Figure 3]

Step 6: In the Stroke Selection dialog, select the line width of the rectangle you wish to draw, the type of line, the pattern and other desirable attributes. [Figure 4]

Step 7: Click on the Stroke button

Step 8: The rectangle is now drawn and selected [Figure 5]

List of Figures

Figure 1 – The GIMP – Rectangular Selection

The GIMP - Rectangular Selection [Figure 1]

Figure 2 – Draw a rectangular region

[Figure 2]

Figure 3 – Stroke Selection

[Figure 3]

Figure 4 – Stroke Selection Dialog
[Figure 4]

Figure 5 – Hurray!

[Figure 5]

Dell Inspiron 6400 – Part 4 – Installing Ubuntu 7.04

A couple of days earlier, I had given a hint of what I was doing with my laptop. Today lets dive deeper and see what that was all about. Well, I installed the most popular Linux distribution, Ubuntu 7.04 (aka Feisty Fawn) on my laptop and it would dual boot with Windows Vista Home Premium that had come preinstalled with the machine. I will share with you my experiences.

Steps

  1. Backup important files

  2. Checklist of required items

  3. Partition hard disk

  4. Install Ubuntu

  5. Reboot and check Windows can still boot

  6. Reboot into Ubuntu

Caution: The steps outlined below deal with partitioning and formatting. If you are following these steps to do the installation yourself and are not sure about a particular step, exercise caution else you might end up losing all the data on your disk. I recommend taking help of a friend who is knowledgeable about partitioning and formatting hard disks.
Backup

Its always a good idea to backup important files before I – for that matter you or anyone else – venture into the exciting world of OS installation. I made sure that my backups can be restored and the files are in good order.

Checklist of required items

  1. Ubuntu 7.04 CD. I downloaded the iso image from here and burnt a CD. Make sure that you download the correct version matching your processor type. Alternately, you can order a pressed CD from Canonical at Shipit

  2. Windows DVD that came with my laptop – for the worst case scenario

Partitioning the hard disk

I had read in the forums that if I need to dual boot with Windows Vista, then I need to partition the disk using the Disk Management tool that comes with Windows. Right click on My Computer > Manage. Select Storage > Disk Management. I shrunk and existing partition and made some free space. I then created three simple partitions to hold the root, home and swap partitions. The first two were 10 GB each and the swap partition was 1 GB in size. I formatted the drives as NTFS. Though this is not required, I went ahead since I did not want to have any trouble while installing. I rebooted my laptop again and made sure that Windows was still able to pull itself up. Yes, it was ok. The new drives showed up correctly. The reason we do the partitioning in Windows is, Windows does not allow changes to the partition table and will require you to restore the partition table using the repair option available on the Windows DVD.

Dell laptops by default would have 4 primary partition one each for the OS, Recovery, Dell Media Direct and a small 50 MB partition for which I saw no use rather than to install a boot manager. The small 50 MB partition was formatted as FAT 16.

Installing Ubuntu

I rebooted my laptop with the Ubuntu CD. You can boot from the CD by selecting the device in the boot menu. On Dell machines you can do this by holding down the F12 key when the system boots up. The networks were configured and I was able to surf the net. I then started the installation. This is now a 7 step process. The first three steps involve selecting your language, keyboard layout and time zone. Next was the partitioning.

Since I already had my drives partitioned, the only task here was to select Manual partitioning and assign the drives to appropriate partitions. I selected the drive, clicked on edit partition and selected the mount point as / (root), home and swap respectively. I also chose the file system as ext3, one of the best available today and asked the partition manager to format my / and home partitions. If you get an error that one of your partitions has some inconsistent sectors, allocation units etc, click on Cancel. Clicking on Ignore will spell trouble during the boot manager installation and render the machine non bootable in either OS. I learnt this the hard way. I was all set and continued with the install. It took around 14 minutes for the install to complete.

Reboot and check Windows can still boot

I rebooted and GRUB appeared. I selected Windows which was listed as the last option. I held my breath as the OS came to life. No signs of trouble here. I was able to login and everything looked so good.

Reboot into Ubuntu

So, I booted into Ubuntu. All was well here too. I was greeted with a popup that said the OS was using restricted drivers for the Wireless device. I tried connecting to a Wireless network and there was no problem. The NTFS drives were automatically mounted as read only and I could open the files on the Windows section of my hard disk. I had at hand a very usable, friendly, fast and stable OS. I strongly feel I can live using Ubuntu alone.

Conclusion

All my fears of dual booting with Windows Vista was laid to rest when I saw that GRUB managed quite well in the end. I am enjoying Ubuntu now and has been a while since I booted into Vista. The memory footprint was also small. Would that not constitute another post? Well, yes, kinda. I am planning to write a review on Ubuntu sometime next week and will cover all these in detail. Some of you might ask why dual boot when I can live with Ubuntu. Simple, I have paid for Windows Vista when I purchased the laptop and I will use it for what it is worth. A few games, Windows DVD creator is a cool app that lets me create photo DVDs with some neat effects. So its going to be both atleast for sometime now.

I am glad to help anyone who might have questions regarding the dual boot installation process. However, my limited time may not be in favor of that and I have to admit that I may not be able to help on time. I recommend that you visit the Ubuntu forums at http://www.ubuntuforums.org.

GNOME 2.18 Released!

Yesterday, GNOME 2.18 was released. GNOME is the free and popular desktop environment for UNIX like operating systems including GNU/Linux.

 The release announcement is here.

Check out whats new in GNOME 2.18.

Download images and source packages are available from this page.

Java becomes Open Source

On Nov 13 something interesting happened. Sun Microsystems released its hugely popular Java platform to Open Source under the GPL 2 Licence. It means that the source code is available for anyone who wants to see and modify it. The modified code would be in the public domain.

Here are a few articles relating to the development

http://www.theinquirer.net/default.aspx?article=35691

http://arstechnica.com/news.ars/post/20061113-8205.html

http://blogs.zdnet.com/microsoft/index.php?p=101Â